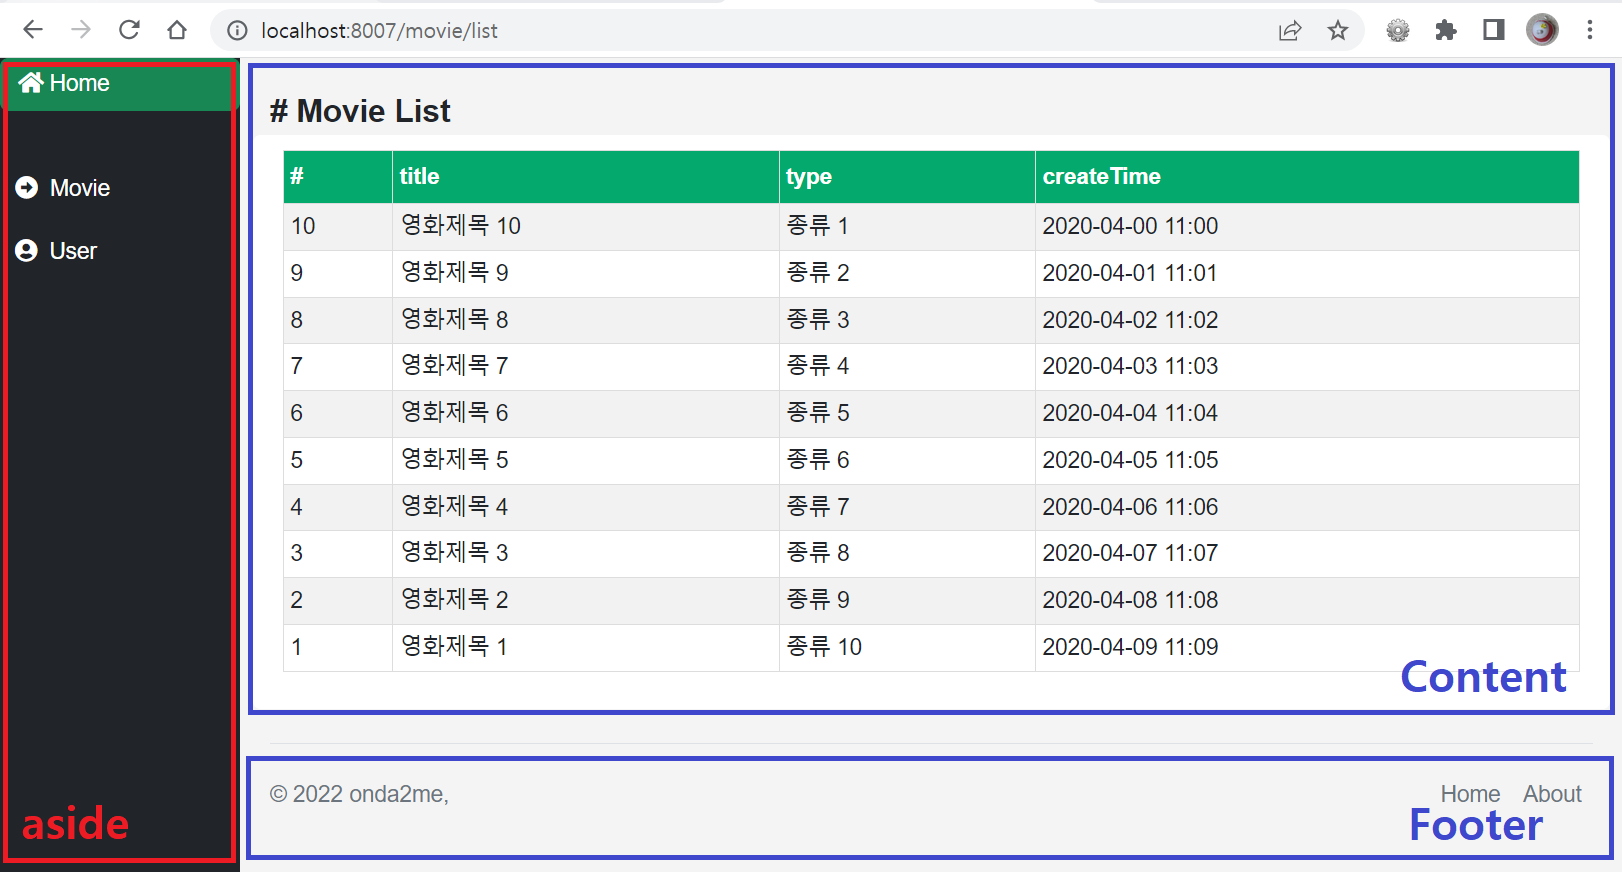
SpringBoot에서 Thymeleaf로 템플릿 설정하여 화면 구성하기
Thymeleaf ?
- Thymeleaf는 자바 기반의 View Template Engine으로 html에 전달하는 데이타로 동적인 View를 제공한다.
- html 템플릿은 html 자체로도 동작하고, 컨트롤러가 전달하는 데이타를 이용하여 동적으로도 화면을 구성한다.
- Header, Footer와 같이 반복적으로 사용되는 화면의 공통영역을 레이아웃 설정파일로 관리하여 중복 코드를 줄일 수 있다.
- Thymeleaf 홈페이지 : https://www.thymeleaf.org/
Apache Tiles과 Thymeleaf의 공통점 및 차이점
-
공통점
Header, Footer와 같이 반복적으로 사용되는 화면의 공통영역을 분리하고 레이아웃 설정파일로 관리하여 중복 코드를 줄일 수 있다. -
차이점
Apache Tiles : 레이아웃 템플릿 엔진으로 설정정보에 따라 화면을 구성해 준다.
Thymeleaf : 텍스트 템플릿 엔진으로 템플릿 양식에 데이타를 넣어 문서를 출력해주며, 레이아웃 템플릿의 구성도 가능하다.
타임리프로 구성한 템플릿 예

스프링부트 환경에서 타임리프를 이용하여 템플릿을 설정하고 화면을 구성해보자.
1. pom.xml 의존성 추가
@pom.xml
<!-- html thymeleaf 사용 -->
<dependency>
  <groupId>org.springframework.boot</groupId>
  <artifactId>spring-boot-starter-thymeleaf</artifactId>
</dependency>
<!-- html thymeleaf layout 사용 -->
<dependency>
  <groupId>nz.net.ultraq.thymeleaf</groupId>
  <artifactId>thymeleaf-layout-dialect</artifactId>
</dependency>
<!-- html thymeleaf sec 사용 -->
<dependency>
    <groupId>org.thymeleaf.extras</groupId>
    <artifactId>thymeleaf-extras-springsecurity5</artifactId>
</dependency>
2. application.yml 설정
@application.yml
#------------------------------------------------
# controller.view-name : /html/* -> thymeleaf
#------------------------------------------------
  thymeleaf:
    cache: false
    check-template-location: false
    enabled: true
    prefix: classpath:/static/templates
    suffix: .html
    view-names: /html/*
3. layout-sample.html 파일 작성
@/static/templates/layouts/layout-sample.html
<!DOCTYPE html>
<html lang="ko"
      xmlns:th="http://www.thymeleaf.org"
      xmlns:layout="http://www.ultraq.net.nz/thymeleaf/layout">

  <head>
    <meta name="viewport" content="width=device-width, initial-scale=1">
    <link rel="stylesheet" href="https://cdn.jsdelivr.net/npm/bootstrap@5.2.3/dist/css/bootstrap.min.css" >
    <link rel='stylesheet' href='https://fonts.googleapis.com/css?family=Roboto'>
    <script src='https://kit.fontawesome.com/a076d05399.js' crossorigin='anonymous'></script>
    <style>
    body {
      font-family: Arial, Helvetica, sans-serif;
      margin: 0;
      background-color: #f4f4f4;
    }
    .body-container {
      margin: 0;
      padding: 0;
    }
    .main-container {
      margin: auto;
      margin-left: 160px;
      max-width: 100%;
    }
    .side-container {
      height: 100%;
      width: 160px;
      position: fixed;
      z-index: 1;
      background-color: #212529;
      overflow-x: hidden;
      padding-top: 10px;
      top: 0;
      left: 0;
      margin: 0;
      padding: 0;
    }
    .content-container {
      padding: 20px;
      width: 100%;
    }
    .main-title {
      font-size: 1.4rem;
      font-weight: 600;
    }
    .portlet {
      padding: 10px 20px;
      width: 100%;
      border-radius: 5px;
      background-color: #fff;
    }
    .vertical-menu {
      width: 100%; /* Set a width if you like */
    }
    .vertical-menu a {
      color: white;
      display: block; /* Make the links appear below each other */
      padding: 10px;
      text-decoration: none; /* Remove underline from links */
    }
    .vertical-menu a:hover {
      color: black;
      background-color: #ccc;/* Dark grey background on mouse-over */
    }
    .tb-success {
      border-collapse: collapse;
      width: 100%;
    }
    .tb-success td, .tb-success th {
      border: 1px solid #ddd;
      padding: 4px;
    }
    .tb-success tr:nth-child(even){background-color: #f2f2f2;}
    .tb-success tr:hover {background-color: #ddd;}
    .tb-success th {
      padding-top: 6px;
      padding-bottom: 6px;
      text-align: left;
      background-color: #04AA6D;
      color: white;
    }
    </style>
  </head>
<body>
  <div class="body-container">

    <aside th:replace="/layouts/sample-aside :: aside"></aside>

    <div class="main-container">
      <div class="content-container">
          <th:block layout:fragment="content"></th:block>
          <footer th:replace="/layouts/sample-footer :: footer"></footer>
      </div>
    </div>
  </div>
</body>
</html>
4. sample-aside.html 파일 작성
@/static/templates/layouts/sample-aside.html
<!DOCTYPE html>
<html xmlns:th="http://www.thymeleaf.org">
<th:block th:fragment="aside">
<aside class="side-container">
<div class="vertical-menu ">
<button type="button" class="btn btn-success w-100 text-start"><span class="fa fa-home"></span> Home</button>
<hr>
<a href="/movie/list"><i class="fas fa-arrow-alt-circle-right"></i><span> Movie</span></a>
<a href="#"><i class=" fas fa-user-circle"></i><span> User</span></a>
</div>
</aside>
</th:block>
</html>
5. sample-footer.html 파일 작성
@/static/templates/layouts/sample-footer.html
<!DOCTYPE html>
<html xmlns:th="http://www.thymeleaf.org">
<th:block th:fragment="footer">
<!-- Footer -->
<footer class="d-flex flex-wrap justify-content-between align-items-center py-3 my-4 border-top">
<p class="col-md-4 mb-0 text-muted">© 2022 onda2me, </p>
<ul class="nav col-md-4 justify-content-end">
<li class="nav-item"><a href="/" class="nav-link px-2 text-muted" target="_blank">Home</a></li>
<li class="nav-item"><a href="#" class="nav-link px-2 text-muted" target="_blank">About</a></li>
</ul>
</footer>
<!-- Footer -->
</th:block>
</html>
6. list.html 파일 작성
@/static/templates/html/movie/listr.html
<!DOCTYPE html>
<html xmlns:th="http://www.thymeleaf.org"
      xmlns:layout="http://www.ultraq.net.nz/thymeleaf/layout"
      layout:decorate="~{/layouts/layout-sample}">

  <th:block layout:fragment="content">
    <div class="row main-head ">
      <div class="col-12 main-title ">
        # Movie List
      </div>
    </div>
    <div class="row ">
      <div class="table-responsive portlet">
        <table class="table table-sm table-hover tb-success">
          <tr class="center">
            <th>#</th>
            <th>title</th>
            <th>type</th>
            <th>createTime</th>
          </tr>
          <th:block th:each="num, numStat : ${#numbers.sequence(1,10)}">
          <tr>
            <td th:text="${numStat.size-numStat.index}"></td>
            <td th:text="${'영화제목 ' + (numStat.size-numStat.index)}"></td>
            <td th:text="${'종류 ' + (numStat.count)}"></td>
            <td th:text="${'2023-04-0' + numStat.index + ' 11:0' + numStat.index}"></td>
          </tr>
          </th:block>
        </table>
      </div>
    </div>
  </th:block>
</html>
7. HomeController.java 파일 작성
@Controller
public class HomeController {

	@RequestMapping(value="/movie/list")
	public String list(Model model) {

		return "/html/movie/list";
	}
}
8. 웹에서 확인
@/movie/list


댓글남기기