이클립스에서 Spring MVC 프로젝트 시작하기
이클립스에서 Spring MVC 프로젝트 생성하고 웹에서 실행해 보자
Spring MVC 프로젝트 생성 방법
- case1) Spring Legacy Project 템플릿으로 만들기
- case2) DynamicWeb Project 템플릿으로 생성 후 Spring 구조 직접 구성해서 만들기
case1) Spring Legacy Project 템플릿으로 프로젝트 생성하기
1. 프로젝트 생성하기
New Project > Spring Legacy Project > spring mvc project
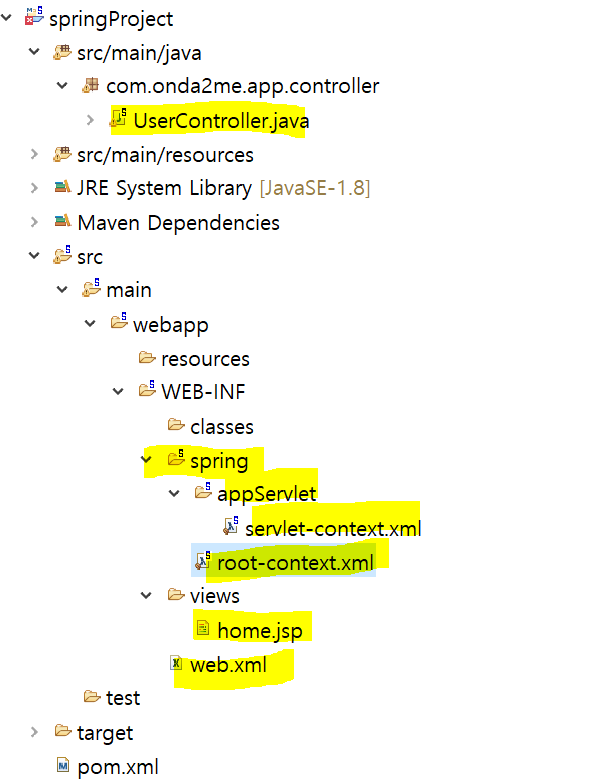
2. 프로젝트 생성결과
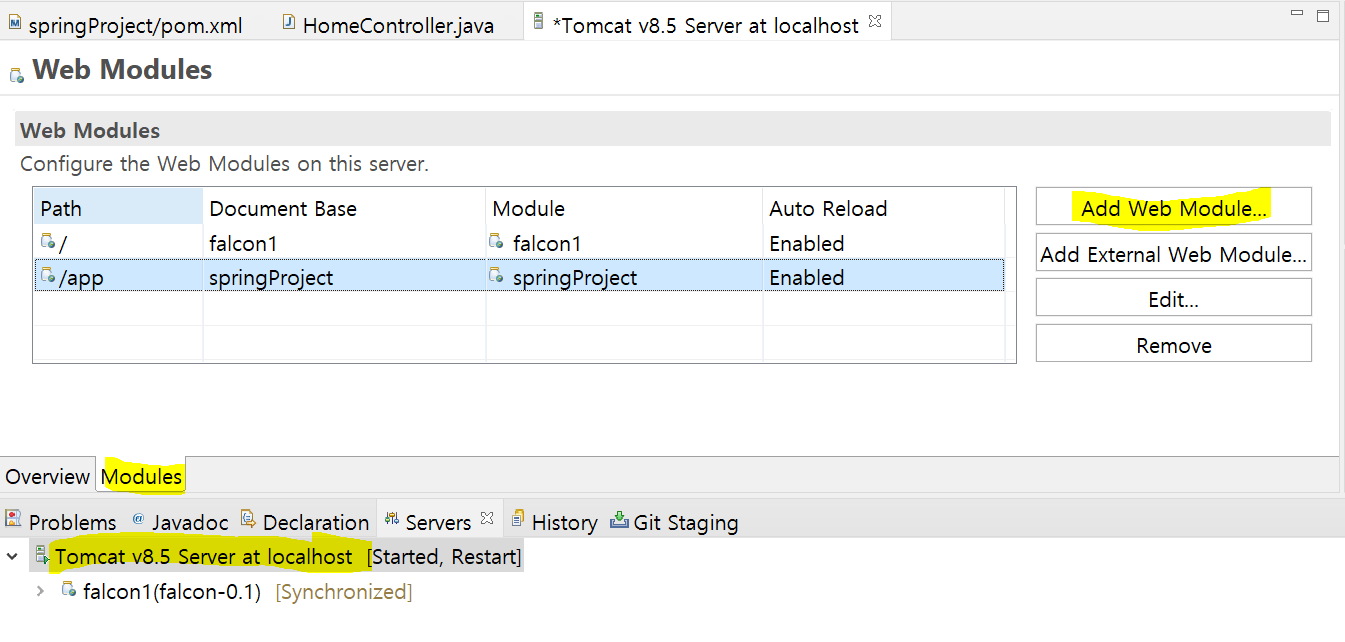
3. Tomcat Server 설정
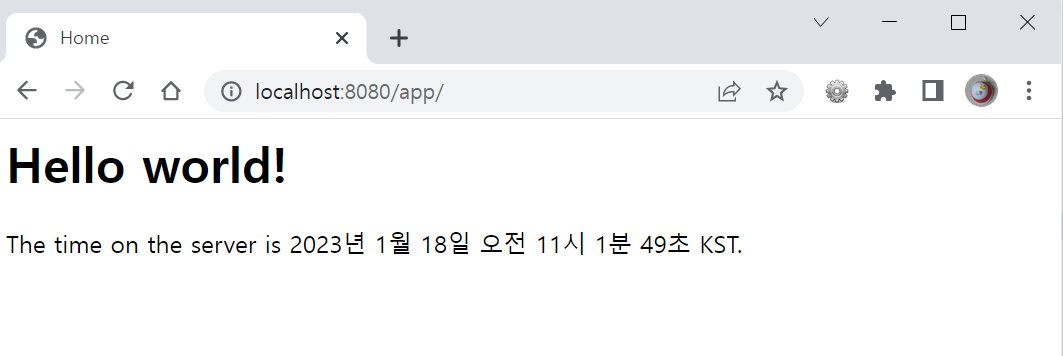
4. 웹에서 확인

5. 인코딩 설정
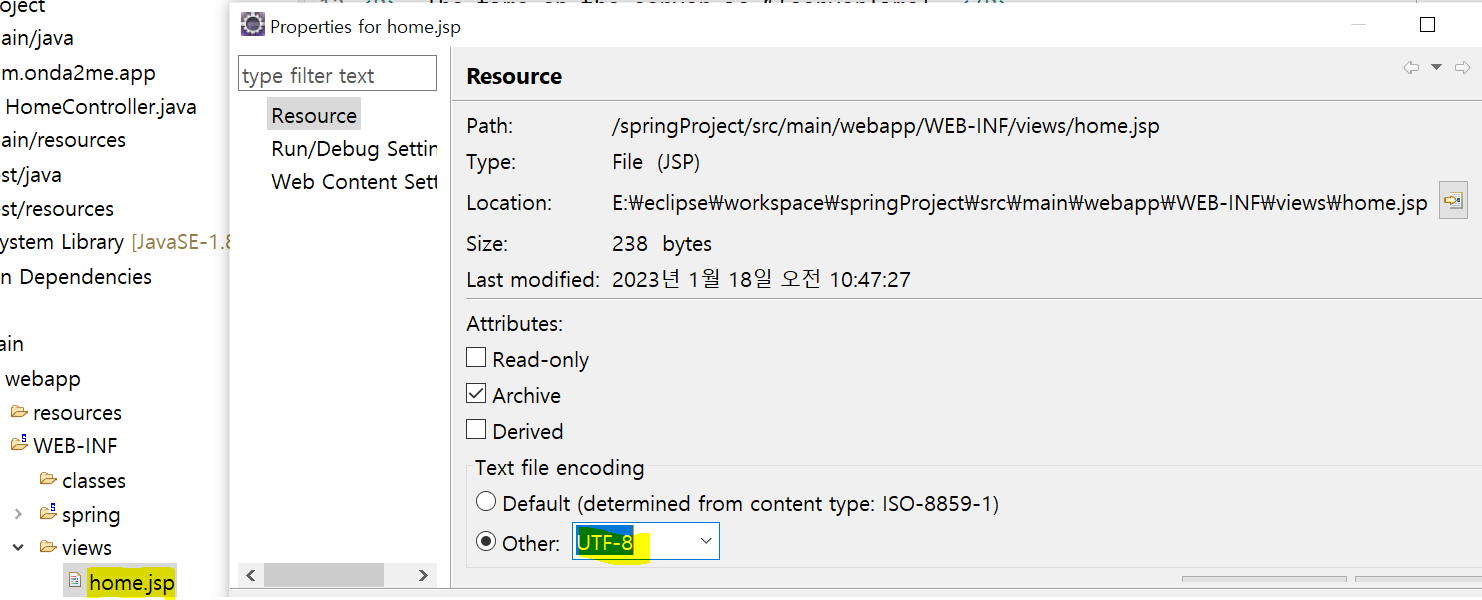
한글 깨짐 해결을 위한 home.jsp 파일 내에 UTF-8 인코딩 추가 및 파일 속성 변경
+ @home.jsp 코드 추가
<%@ page language="java" contentType="text/html; charset=UTF-8" pageEncoding="UTF-8"%>
+ @home.jsp 파일의 properties 설정
6. 웹에서 확인
case2) Dynamic Web Project 템플릿으로 프로젝트 생성하기
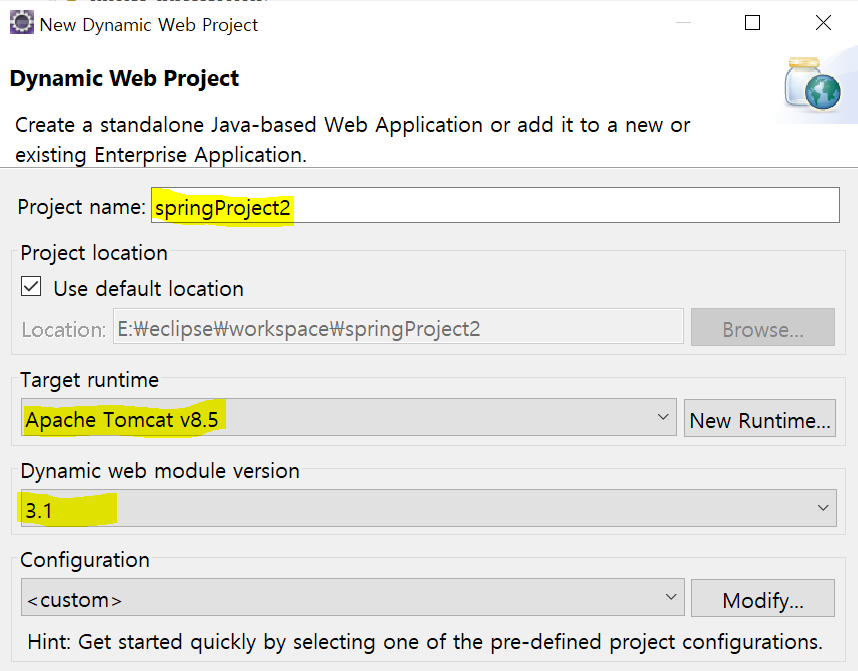
1. 프로젝트 생성하기
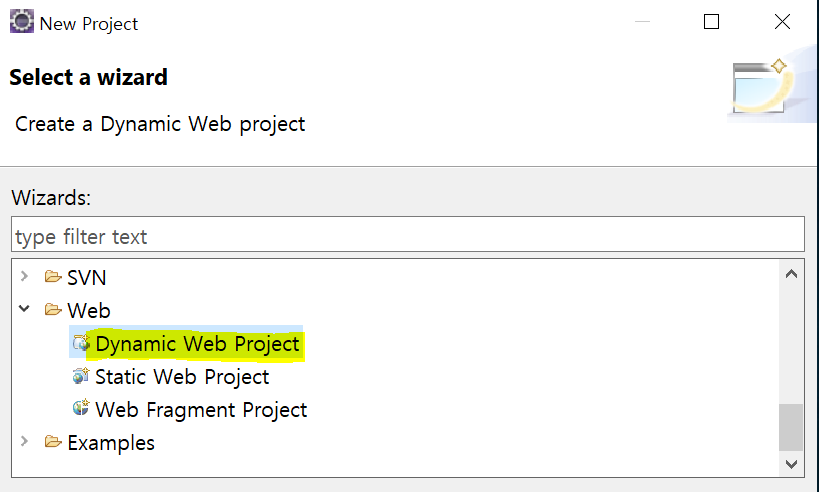
New Project > Web > Dynamic Web Project
2. Maven 프로젝트로 변경
Project > Configure > Convert to Maven Project > pom.xml 파일 자동 생성
3. @pom.xml 수정
spring, servlet, logging dependency 추가
<!-- Logging -->
<dependency>
    <groupId>org.slf4j</groupId>
    <artifactId>slf4j-api</artifactId>
    <version>${org.slf4j-version}</version>
</dependency>
<dependency>
    <groupId>org.slf4j</groupId>
    <artifactId>jcl-over-slf4j</artifactId>
    <version>${org.slf4j-version}</version>
    <scope>runtime</scope>
</dependency>
<dependency>
    <groupId>org.slf4j</groupId>
    <artifactId>slf4j-log4j12</artifactId>
    <version>${org.slf4j-version}</version>
    <scope>runtime</scope>
</dependency>
<dependency>
    <groupId>log4j</groupId>
    <artifactId>log4j</artifactId>
    <version>1.2.15</version>
    <exclusions>
        <exclusion>
            <groupId>javax.mail</groupId>
            <artifactId>mail</artifactId>
        </exclusion>
        <exclusion>
            <groupId>javax.jms</groupId>
            <artifactId>jms</artifactId>
        </exclusion>
        <exclusion>
            <groupId>com.sun.jdmk</groupId>
            <artifactId>jmxtools</artifactId>
        </exclusion>
        <exclusion>
            <groupId>com.sun.jmx</groupId>
            <artifactId>jmxri</artifactId>
        </exclusion>
    </exclusions>
    <scope>runtime</scope>
</dependency>

<!-- @Inject -->
<dependency>
    <groupId>javax.inject</groupId>
    <artifactId>javax.inject</artifactId>
    <version>1</version>
</dependency>

<!-- Servlet -->
<dependency>
    <groupId>javax.servlet</groupId>
    <artifactId>servlet-api</artifactId>
    <version>2.5</version>
    <scope>provided</scope>
</dependency>
<dependency>
    <groupId>javax.servlet.jsp</groupId>
    <artifactId>jsp-api</artifactId>
    <version>2.1</version>
    <scope>provided</scope>
</dependency>
<dependency>
    <groupId>javax.servlet</groupId>
    <artifactId>jstl</artifactId>
    <version>1.2</version>
</dependency>
4. Maven 프로젝트 업데이트
Project > Maven > Update Project
5. Tomcat Server 설정

6. @index.html 작성
<body>
hello~~!! web.<br/>
index.html<br/>
</body>
7. 웹에서 확인

8. spring 설정파일 추가
+ @root-context.xml
<?xml version="1.0" encoding="UTF-8"?>
<beans xmlns="http://www.springframework.org/schema/beans"
	xmlns:xsi="http://www.w3.org/2001/XMLSchema-instance"
	xsi:schemaLocation="http://www.springframework.org/schema/beans
    http://www.springframework.org/schema/beans/spring-beans.xsd">

</beans>
+ @servlet-context.xml
<?xml version="1.0" encoding="UTF-8"?>
<beans:beans xmlns="http://www.springframework.org/schema/mvc"
    xmlns:xsi="http://www.w3.org/2001/XMLSchema-instance"
    xmlns:beans="http://www.springframework.org/schema/beans"
    xmlns:context="http://www.springframework.org/schema/context"
    xsi:schemaLocation="http://www.springframework.org/schema/mvc
        https://www.springframework.org/schema/mvc/spring-mvc.xsd
        http://www.springframework.org/schema/beans
        https://www.springframework.org/schema/beans/spring-beans.xsd
        http://www.springframework.org/schema/context
        https://www.springframework.org/schema/context/spring-context.xsd">

    <!-- Enables the Spring MVC @Controller programming model -->
    <annotation-driven />

    <!-- Handles HTTP GET requests for /resources/** by efficiently serving up static resources in the ${webappRoot}/resources directory -->
    <resources mapping="/resources/**" location="/resources/" />

    <!-- Resolves views selected for rendering by @Controllers to .jsp resources in the /WEB-INF/views directory -->
    <beans:bean class="org.springframework.web.servlet.view.InternalResourceViewResolver">
        <beans:property name="prefix" value="/WEB-INF/views/" />
        <beans:property name="suffix" value=".jsp" />
    </beans:bean>

    <context:component-scan base-package="com.onda2me.app.controller" />
</beans:beans>
9. @web.xml 수정
    <!-- The definition of the Root Spring Container shared by all Servlets and Filters -->
    <context-param>
        <param-name>contextConfigLocation</param-name>
        <param-value>/WEB-INF/spring/root-context.xml</param-value>
    </context-param>

    <!-- Creates the Spring Container shared by all Servlets and Filters -->
    <listener>
        <listener-class>org.springframework.web.context.ContextLoaderListener</listener-class>
    </listener>

    <!-- Processes application requests -->
    <servlet>
        <servlet-name>appServlet</servlet-name>
        <servlet-class>org.springframework.web.servlet.DispatcherServlet</servlet-class>
        <init-param>
            <param-name>contextConfigLocation</param-name>
            <param-value>/WEB-INF/spring/appServlet/servlet-context.xml</param-value>
        </init-param>
        <load-on-startup>1</load-on-startup>
    </servlet>
    <servlet-mapping>
        <servlet-name>appServlet</servlet-name>
        <url-pattern>*.co</url-pattern>
    </servlet-mapping>
10. @HomeController 추가
@Controller
public class HomeController {
	@RequestMapping(value = "/home.co", method = RequestMethod.GET)
	public String home(Locale locale, Model model) {
		Date date = new Date();
		DateFormat dateFormat = DateFormat.getDateTimeInstance(DateFormat.LONG, DateFormat.LONG, locale);

		String formattedDate = dateFormat.format(date);
		model.addAttribute("serverTime", formattedDate );

		return "home";
	}
}
11. @home.jsp 추가
<body>
<h1>Hello world!  </h1>
<P>  The time on the server is ${serverTime}. </P>
</body>
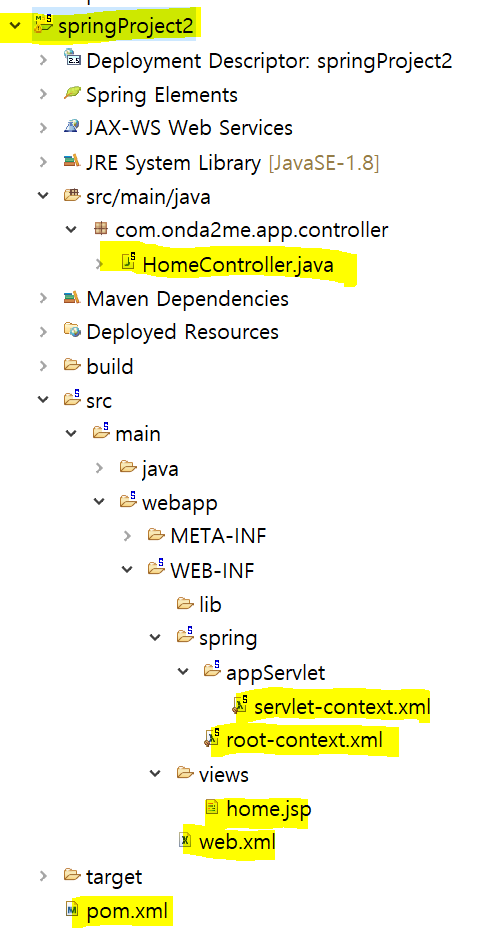
12. 프로젝트 생성 결과
13. 웹에서 확인




댓글남기기