
구글 Text To Speech API를 활용한 TTS 서비스 구축
구글 Text to Speech API(TTS: 텍스트 음성 변환) 는 텍스트를 사람처럼 읽어주는 음성 합성 API로 Google AI 기술을 기반으로 글자를 음성(Text -> Speech)으로 변환하는 서비스이다.
1. 기본 개념
구글의 Text-to-Speech는 텍스트 또는 음성 합성 마크업 언어(SSML) 입력을 MP3 또는 LINEAR16(WAV 파일에서 사용되는 인코딩)과 같은 오디오 데이터로 변환하며,
WaveNet이라는 고급 딥러닝 모델을 기반으로 동작하기 때문에 일반적인 TTS보다 자연스럽고 사람같은 발음을 제공한다.
변환 된 오디오 데이터 파일은 애플리케이션 성능을 강화하거나 동영상 또는 오디오 녹음과 같은 미디어를 보강하는 데 사용할 수 있다.
Google Cloud Text-to-Speech API는 다음과 같은 과정을 통해 기능을 제공한다.
- 텍스트를 입력
- 언어, 음성스타일, 성별, 속도 설정
- 자연스러운 음성으로 변환
2. 주요 기능
| 기능 | 설명 |
|---|---|
| 다양한 언어/음성 | 50개 이상 언어와 200개 이상의 음성(남/여, 억양) 지원 |
| WaveNet 음성 | Google DeepMind의 WaveNet 기반 고품질 음성 |
| SSML 지원 | SSML(Speech Synthesis Markup Language)로 억양, 멈춤, 강세 조절 가능 |
| 속도/피치 조절 | 말하는 속도(speed), 음의 높이(pitch) 조절 가능 |
| 다양한 출력 포맷 | MP3, LINEAR16 (WAV), OGG 등 선택 가능 |
| 클라우드 API | REST API 또는 gRPC로 호출 가능 |
| 인증 기반 | Google Cloud 서비스 계정을 통한 인증 필요 |
3. 기본적인 API 사용 과정
- Google Cloud 프로젝트 생성
- Text-to-Speech API 활성화
- 서비스 계정 키 생성(JSON)
- 코드 또는 REST 호출을 통해 API 요청
1) 명령줄을 사용한 오디오 변환
-
Json 예제
{
"input": {
  "text": "Android is a mobile operating system developed by Google, based on the Linux kernel and designed primarily for touchscreen mobile devices such as smartphones and tablets."
},
"voice": {
  "languageCode": "en-gb",
  "name": "en-GB-Standard-A",
  "ssmlGender": "FEMALE"
},
"audioConfig": {
  "audioEncoding": "MP3"
}
}
→ 응답으로는 base64 인코딩된 오디오 파일이 오고, 디코딩해서 저장하면 된다.
4. 활용 예시
- 챗봇/가상 비서 음성 출력
- 전자책 읽어주기
- 내비게이션 안내 음성
- 시각장애인 접근성 서비스
- 자동 전화 응답 시스템 (IVR)
5. Java 프로젝트 TTS API 적용
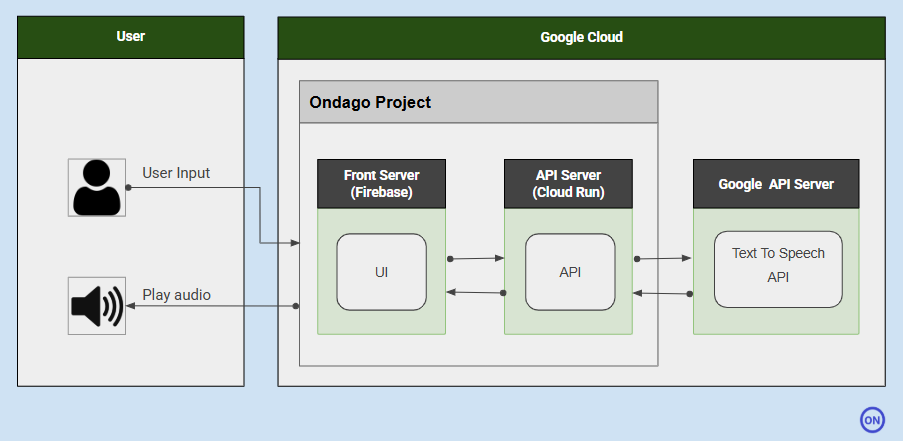
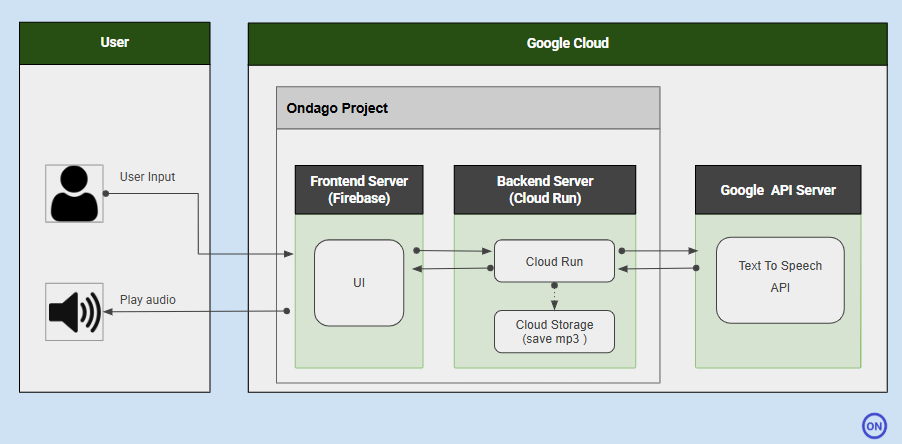
1) 서비스 개요
-
서비스 구성
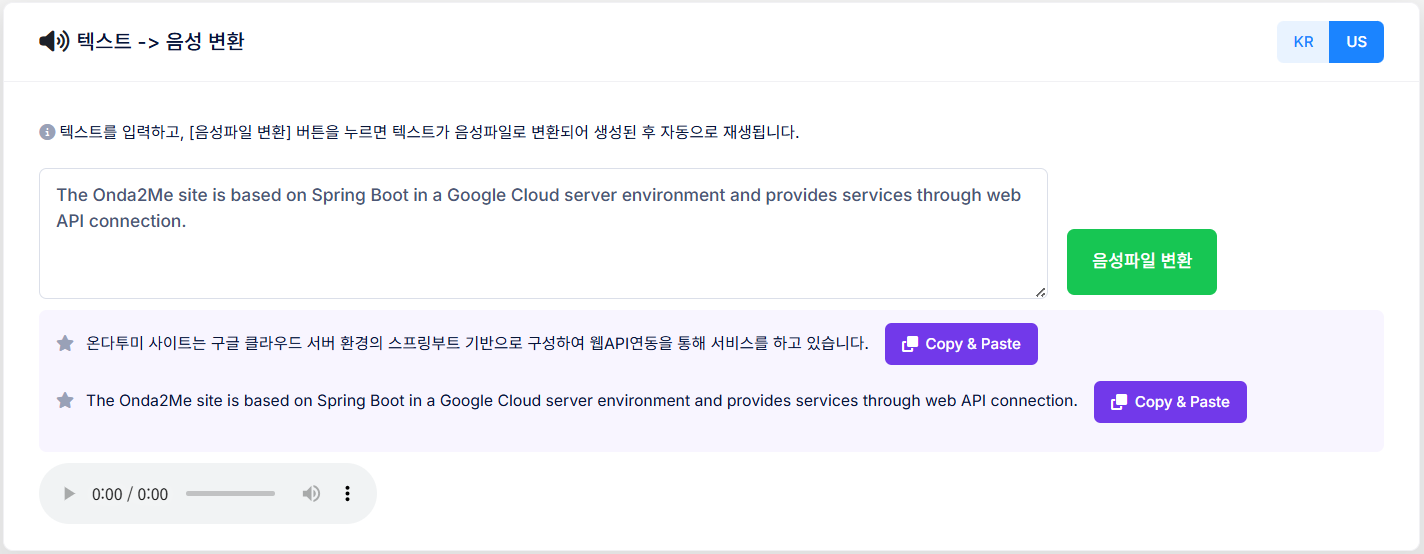
-
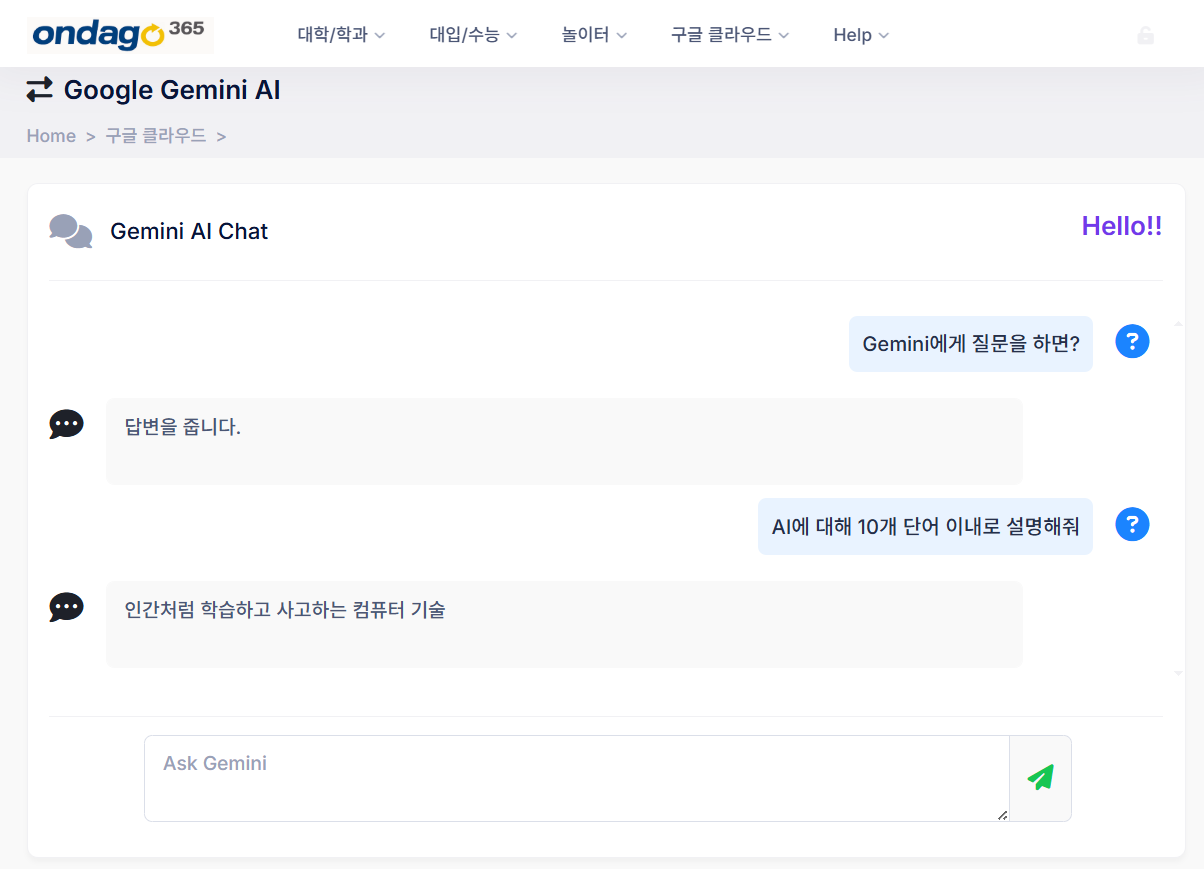
UI 화면
TTS 데모사이트 바로가기
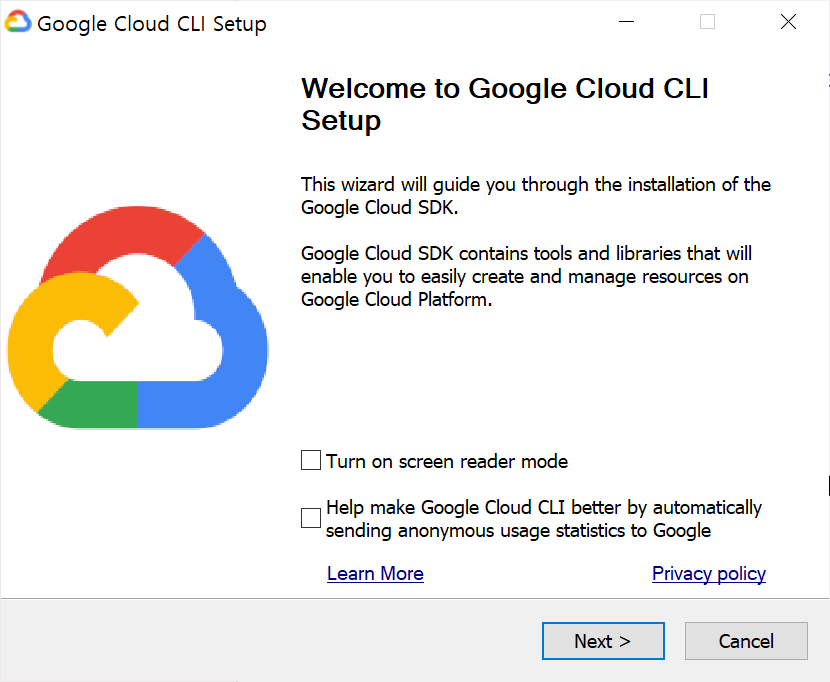
2) Google Cloud CLI 다운로드 및 설치
- Google Cloud CLI 사이트 접속
바로가기: https://cloud.google.com/sdk/docs/install-sdk
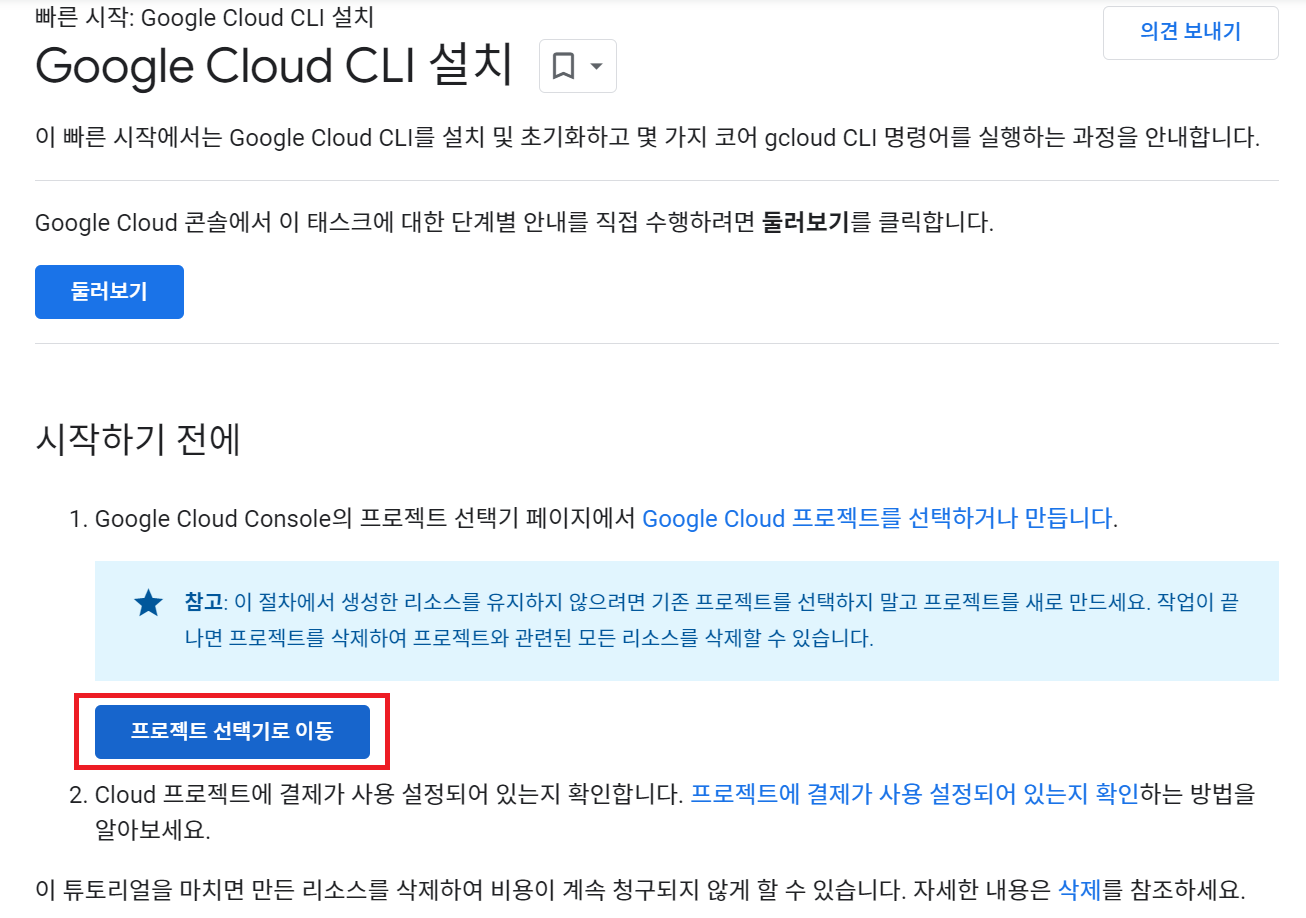
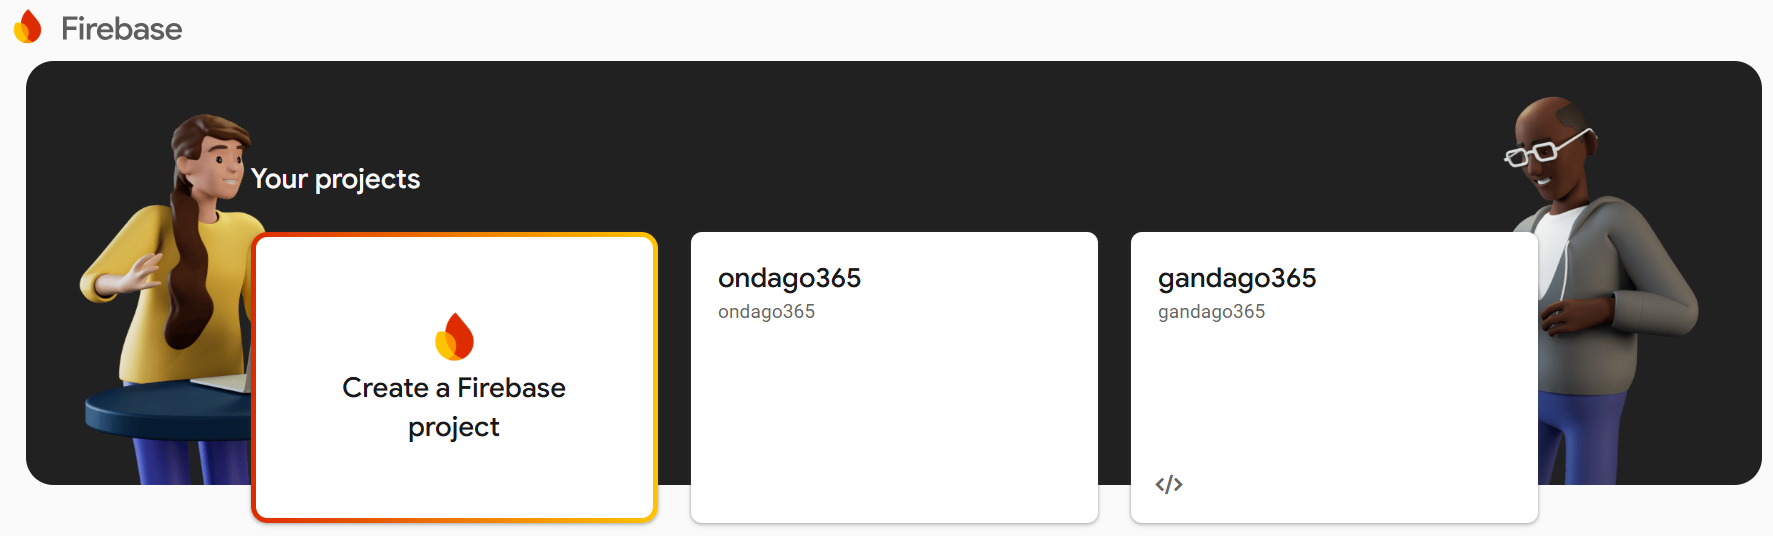
3) Google Project 생성 및 선택
-
Google Project 선택
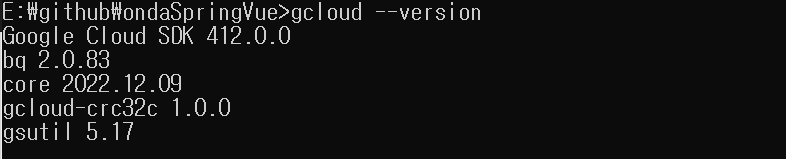
- 설치확인 명령어
gcloud --version - 설치확인 결과
4) Google CLI 실행
- Google CLI 실행 명령어
gcloud init -
Google CLI 실행 결과
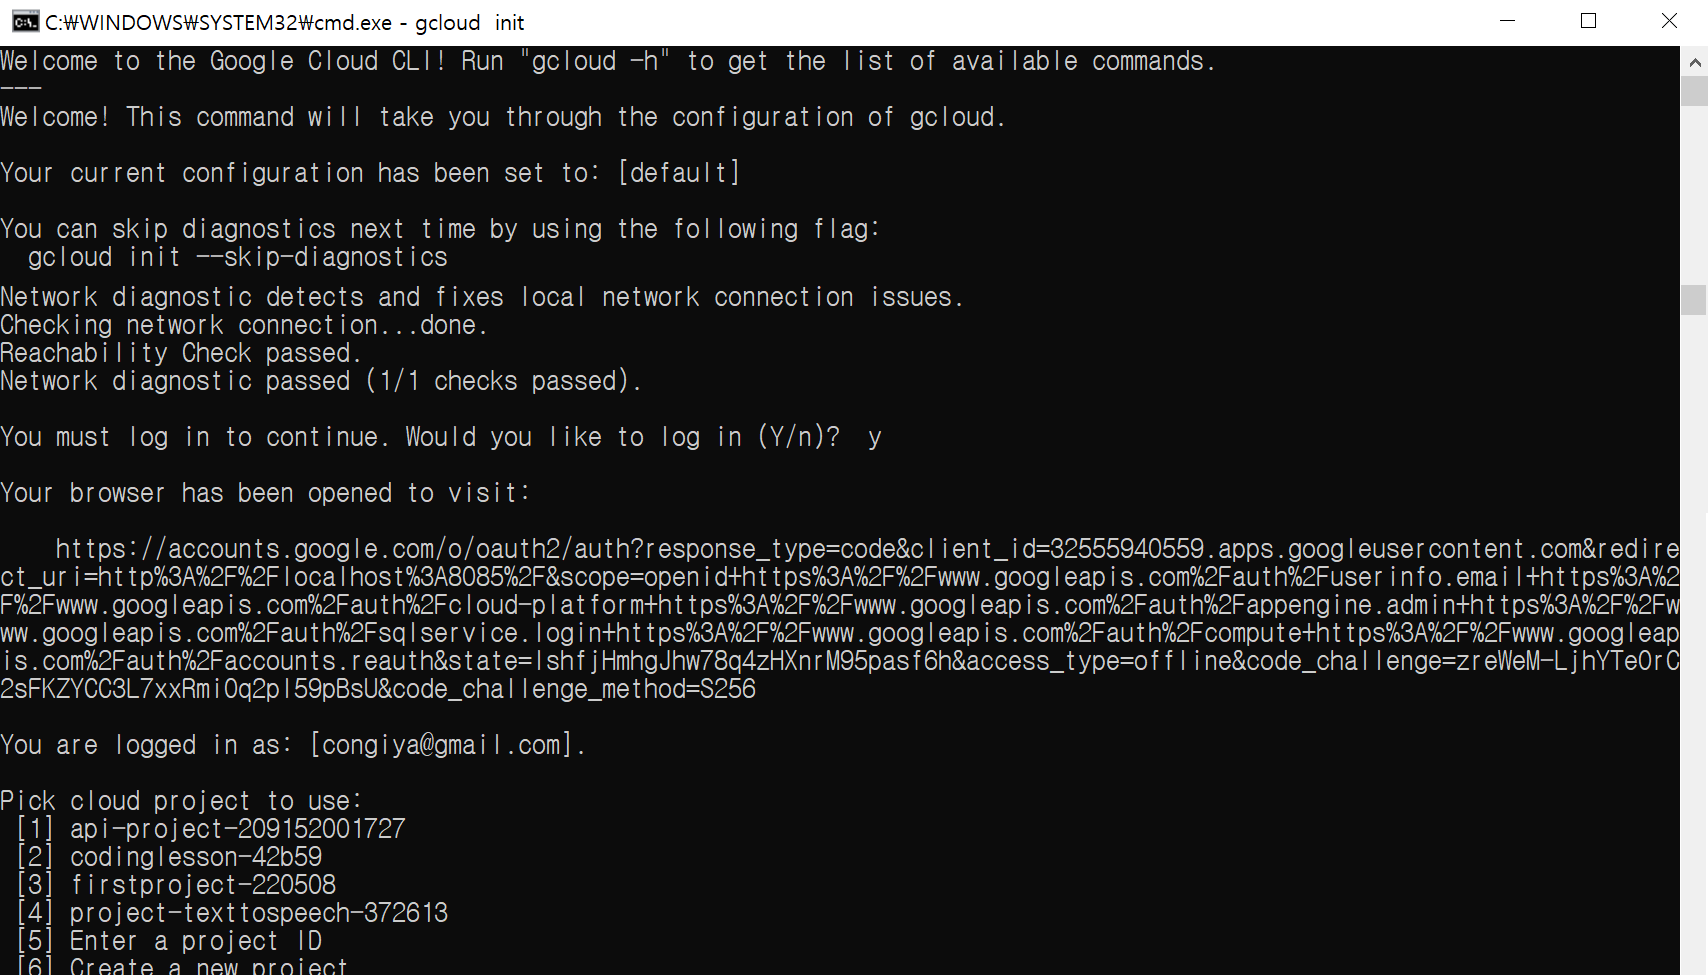
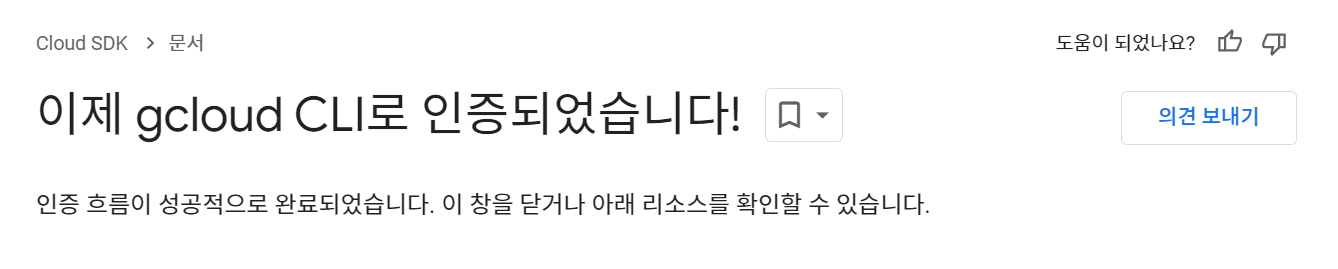
- Google CLI 웹 인증
5) Java Project 설정
- @pom.xml 설정 추가
  <dependencyManagement>
    <dependencies>
      <dependency>
        <groupId>com.google.cloud</groupId>
        <artifactId>libraries-bom</artifactId>
        <version>26.1.4</version>
        <type>pom</type>
        <scope>import</scope>
      </dependency>
    </dependencies>
  </dependencyManagement>

  <dependencies>
    <dependency>
      <groupId>com.google.cloud</groupId>
      <artifactId>google-cloud-texttospeech</artifactId>
    </dependency>
  </dependencies>
- Controller 추가
  public class TTSAPIController {

    @RequestMapping(value="/tospeech")
    public int speech(@RequestParam HashMap<String, String> paramMap) throws Exception {

        int len = 0;
        if(paramMap.get("contents") != null) {
            String lngCode = "ko-KR";
            String fileName = "speech-ko-KR.mp3";

            len = synthesizeText(
                    paramMap.get("contents").toString(), lngCode, fileName, "speech/"
                  ).size();
        }

        return len;
    }

    public static ByteString synthesizeText(String contents, String lngCode, String fileName, String filePath ) throws IOException {
        ByteString audioContents = null;
        OutputStream out = null;
        try {

          TextToSpeechClient textToSpeechClient = TextToSpeechClient.create();

          // Set the text input to be synthesized
          SynthesisInput input = SynthesisInput.newBuilder().setText(contents).build();

          // Build the voice request
          VoiceSelectionParams voice =
              VoiceSelectionParams.newBuilder()
                  .setLanguageCode(lngCode) // languageCode = en-US / ko-KR
                  .setSsmlGender(SsmlVoiceGender.FEMALE) // ssmlVoiceGender = SsmlVoiceGender.MALE / FEMALE
                  .build();

          // Select the type of audio file you want returned
          AudioConfig audioConfig =
              AudioConfig.newBuilder()
                  .setAudioEncoding(AudioEncoding.MP3) // MP3 audio.
                  .build();

          // Perform the text-to-speech request
          SynthesizeSpeechResponse response =
              textToSpeechClient.synthesizeSpeech(input, voice, audioConfig);

          // Get the audio contents from the response
          audioContents = response.getAudioContent();
          //logger.info("Audio written size: "+audioContents.size());

          // save audio file
          out = new FileOutputStream(new File(filePath+fileName));
          out.write(audioContents.toByteArray());
          out.flush();

        } finally {
            if(out != null) out.close();
        }

        return audioContents;
    }
  }
6. Java 프로젝트 TTS API 보완
1) 서비스 보완의 이유
Google Cloud TTS API를 이용해서 생성한 audio 파일은 일반적인 서버에서는 파일로 바로 저장이 가능하지만, Google Cloud Run 서버에는 바로 저장이 불가능하다. 따라서 파일 생성 위치를 Google Storage로 변경하는 과정이 필요하다. Google Storage에 audio 파일을 저장하고, 이를 웹에서 streaming 하기 위해서는 복잡한 GCloud 설정 과정이 필요하다.
- Google Cloud TTS 보완 설정과정 요약
- Cloud run 서비스가 Storage에 파일을 저장할 수 있는 권한 설정
- Storage에 upload 할 bucket 생성
- upload용 bucket을 웹에서 접근가능하도록 public 권한 설정
- 파일저장 장소를 Google Storage의 bucket으로 지정
2) 서비스 개요
- 서비스 구성
3) Java Project 수정
- Controller 수정
  public class TTSAPIController {

    // 버킷 이름: mybucket
    // 접근 허용할 폴더 (prefix): upload/tts/
    // 접근 허용 대상: user@example.com
    // 역할: roles/storage.objectViewer
    public static void uploadStorage(
        String projectId, String bucketName, String fileName, String filePath, ByteString audioContents) throws IOException {

        Storage storage = StorageOptions.newBuilder().setProjectId(projectId).build().getService();
        BlobId blobId = BlobId.of(bucketName, filePath+fileName);
        BlobInfo blobInfo = BlobInfo.newBuilder(blobId).build();
        byte[] content = audioContents.toByteArray();

        try (WriteChannel writer = storage.writer(blobInfo)) {
          writer.write(ByteBuffer.wrap(content));

          logger.debug(
              "Wrote to " + filePath + fileName + " in bucket " + bucketName + " using a WriteChannel.");
        }
    }
  }
댓글남기기